Introduction
DIY red light therapy panels attract buyers who want high LED counts and wide coverage at a lower upfront cost than commercial devices. The appeal is real - raw components (LED strips, drivers, enclosures) can be assembled for $100-$300 that might seem comparable to commercial panels at $500-$1,500.
This guide covers what a DIY setup actually involves, where the real costs show up, and the critical limitation that most DIY guides do not address: you cannot verify the wavelength you are actually delivering.
Key Takeaways
- DIY panels can be assembled for lower upfront cost, but total cost including components, enclosure, wiring, and safety measures is often higher than it appears
- The most significant limitation of DIY panels is wavelength verification - consumer LED strips rarely deliver accurate claimed wavelengths, and you have no way to confirm without ISO-accredited lab equipment
- Without verified wavelength output, you cannot confirm you are delivering photobiomodulation at the clinically relevant range (630-670nm)
- Commercial panels from credible manufacturers provide verified wavelengths, consistent irradiance, regulatory clearance, and warranties that DIY cannot replicate
- DIY makes more sense as a learning exercise or for users who cannot afford commercial devices; for therapeutic use, verified output matters more than LED count
What a DIY Red Light Therapy Panel Requires
A functional DIY red light panel requires:
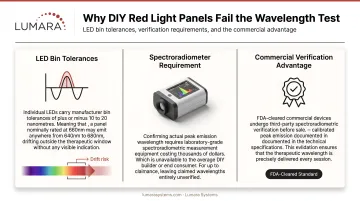
LED strips or arrays: Consumer red LED strips vary significantly in actual wavelength output. Strips labeled "660nm" or "red" may output anywhere from 620nm to 680nm depending on manufacturer tolerances. The labeled wavelength is usually the peak wavelength of the LED bin, but bin tolerances of ±20nm are common. Understanding how wavelength affects skin penetration matters when selecting components.
LED driver: Provides regulated current to the LEDs. The driver must match the voltage and current requirements of your LED configuration. Incorrect drivers cause LED degradation and inconsistent output.
Enclosure/frame: Manages heat dissipation. LEDs produce heat; without adequate thermal management, output degrades over time and LEDs fail earlier. Aluminum channels or heat sinks are standard.
Wiring and connectors: Proper gauge wiring, strain relief, and waterproofing if intended for bathroom use.
Power supply and safety: Proper fusing, grounding, and ensuring the power supply is appropriate for the load.
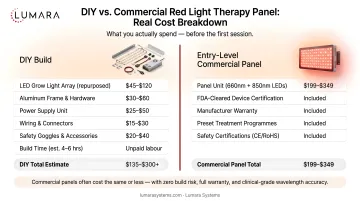
The Real Cost Breakdown
A simple 12-strip, single-panel DIY build typically requires:
| Component | Approximate cost |
|---|---|
| LED strips (12x) | $30-$80 |
| LED driver | $15-$40 |
| Aluminum channel/heat sink | $20-$50 |
| Enclosure or frame | $20-$60 |
| Wiring, connectors, hardware | $10-$30 |
| Power supply | $15-$35 |
| Total | $110-$295 |
This excludes time investment (typically 4-8 hours for a first build), tools, any failed components, and the cost of any safety testing. A second or upgraded build typically costs more once you understand the limitations of the first.
At the $300-$500 range for entry commercial panels, the cost advantage of DIY narrows significantly when time is included.
The Wavelength Verification Problem
This is the most significant issue with DIY panels for therapeutic use, and most DIY guides skip it entirely.
Consumer LED strips labeled "660nm" are not certified to deliver exactly 660nm. They are typically binned LEDs with a nominal peak wavelength in a range. The actual peak wavelength of your specific strip might be 645nm, 660nm, 672nm, or somewhere else in the red spectrum depending on which manufacturing batch you received.
Why this matters:
The clinical research supporting red light therapy for skin, collagen, inflammation, and tissue repair is based on specific wavelength windows - primarily 630-670nm, with 660nm having the densest research. A device delivering 645nm or 675nm does not replicate the conditions of the research it is compared against.
To verify actual wavelength output, you need spectroradiometer testing performed by an ISO/IEC 17025-accredited laboratory using properly calibrated measurement equipment. That level of testing is not realistically available to most DIY builders. Without this verification, you are operating on assumption.
Commercial manufacturers who invest in third-party wavelength verification - including Lumara's triple-tested wavelength process - are providing something that DIY simply cannot replicate. For a deeper look at how infrared and red light differ, that distinction also applies to sourcing components.
Safety and Regulatory Considerations
DIY panels are not FDA cleared. They have not been through any regulatory review for safety or efficacy claims. This matters in two ways:
Safety: LED drivers, power supplies, and wiring in DIY builds are not certified for the specific device configuration. Failure modes include overheating, electrical safety risks, and LED degradation patterns that may not be obvious during bare-skin use.
Efficacy claims: You cannot legitimately claim therapeutic efficacy from a device that has not been through any regulatory review. If the goal is therapeutic use (skin wellness, recovery support), building a device around regulatory-grade specifications matters.
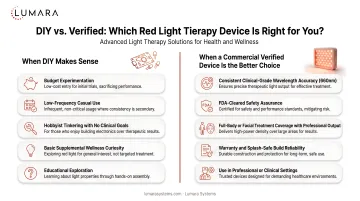
When DIY Makes Sense vs When It Does Not
DIY may be reasonable for:
- Learning about LED electronics and light therapy principles
- Users who cannot afford commercial devices and want some exposure to red light
- Supplemental use alongside a verified primary device
- Experimentation and curiosity-driven exploration
DIY does not replace commercial devices for:
- Therapeutic use where wavelength accuracy and dose consistency matter
- Any application where you want to replicate research-backed protocols
- Users who need verified output and regulatory-grade safety
What Purpose-Built Devices Provide That DIY Cannot
Verified wavelength: Lumara's Illuminate V2 undergoes triple wavelength testing to confirm 660nm output.
Consistent irradiance: Commercial devices are engineered for consistent irradiance across the LED array. DIY builds with varying LED-to-driver ratios produce inconsistent output.
Thermal management: Purpose-built panels are engineered with thermal management designed for their specific LED configuration.
Warranty and support: Illuminate V2 carries a 3-year warranty. If LEDs fail or output degrades, there is recourse. DIY has no warranty.
FDA clearance: Illuminate V2 is FDA cleared as a Class II medical device.
For users who want the output of a DIY panel without the uncertainty, Lumara's Illuminate V2 - 1,800 LEDs, 1,200 cm², 6,000 joules in 5 minutes, verified 660nm, FDA cleared, splash-safe, 3-year warranty - is purpose-built to remove every variable that DIY leaves unresolved.
Frequently Asked Questions
Can you build a DIY red light therapy panel?
Yes, DIY panels can be assembled from LED strips, drivers, and basic enclosures. The limitation is wavelength verification - consumer LED strips rarely deliver confirmed exact wavelengths.
Is a DIY red light therapy panel as effective as commercial?
Not reliably. Without verified wavelength and consistent irradiance, you cannot confirm your DIY panel is performing therapeutically.
What LEDs should I use for a DIY red light panel?
For skin applications, LEDs nominally binned at 660nm. For deeper tissue, NIR LEDs nominally binned at 850nm. The keyword is "nominally" - actual output requires verification.
How much does a DIY red light therapy panel cost?
Component costs run $110-$295. Total cost including time and typically a second iteration is often $300-$500 - comparable to entry commercial devices.
Why do commercial red light therapy panels cost more than DIY?
Commercial pricing reflects verified wavelength output, quality thermal management, consistent irradiance, regulatory compliance, warranty, and engineering cost.
Build It If You Want to Learn. Buy Verified If You Want Results.
DIY red light therapy panels are a legitimate engineering project for curious builders. As therapeutic devices, they have a fundamental limitation: unverified wavelength output means unverified dose delivery.
Lumara's Illuminate V2 exists for buyers who want verified 660nm output, consistent irradiance across 1,200 cm², 5-minute treatment sessions, FDA clearance, and a 3-year warranty - without the uncertainty.