Introduction
Stretch marks (striae) are a common skin concern with limited treatment options. They form when the dermis is stretched rapidly - from growth spurts, pregnancy, rapid weight changes, or muscle development - causing collagen and elastin fibers to rupture.
Red light therapy at 660nm has a plausible and evidence-supported mechanism for stretch mark improvement: it stimulates collagen synthesis in the dermis. This guide covers what the research shows, what realistic results look like, and how to build an effective at-home protocol.
Key Takeaways
- Red light therapy at 660nm stimulates fibroblast activity and collagen production, which can improve the appearance of stretch marks
- New stretch marks (red/purple stage) respond better than established white/silver marks
- With a properly powered red light system, some users may notice early changes in skin radiance or feel after just a few treatments, while deeper texture, tone, and collagen-related improvements build with consistent use
- Device coverage matters significantly - stretch marks occur across large body areas where a full panel is more practical than a small handheld
- 5-minute sessions with a high-output panel make consistent daily use achievable
Why Red Light Therapy Is Relevant to Stretch Marks
Stretch marks are fundamentally a collagen and elastin damage problem. The dermis is disrupted; normal collagen architecture is replaced by scar-like tissue lacking density and organization.
Red light at 660nm drives fibroblast activity and collagen synthesis - the cellular process that builds and organizes collagen in the dermis. This is the same mechanism behind red light therapy's well-documented skin quality benefits. For stretch marks, the goal is supporting remodeling of affected dermal tissue over time.
New vs Established Stretch Marks
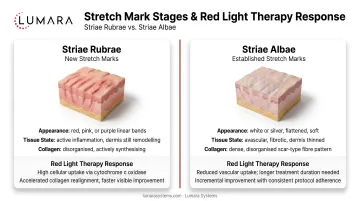
New stretch marks (striae rubrae): Red, pink, or purple in color, typically present for less than 1-2 years. Tissue is still in active remodeling phase. Red light therapy is most effective here - supporting the remodeling process before marks mature to scar tissue.
Established stretch marks (striae albae): White or silver, present for years. Tissue has completed remodeling into scar-like dermis. Red light therapy can improve texture and appearance but improvement is slower and more modest.
For anyone noticing new stretch marks forming, starting red light therapy early produces the best outcomes.
How to Use Red Light Therapy for Stretch Marks
Target Areas and Coverage
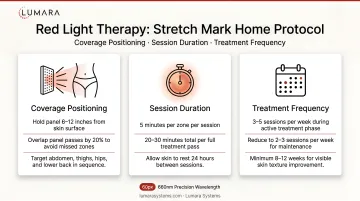
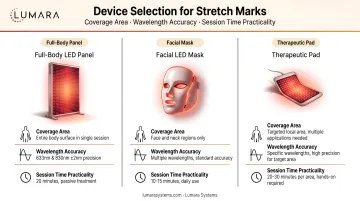
Stretch marks most commonly affect the abdomen, thighs, hips, buttocks, breasts, and upper arms - large body surface areas. A handheld device covering only a few square centimeters per pass will require many minutes of repositioning and produce inconsistent coverage. A panel covering 1,000+ cm² addresses practical coverage needs.
Lumara's Illuminate V2 delivers 6,000 joules across 1,200 cm² in 5 minutes. For a detailed comparison of panel devices versus masks, coverage differences are discussed further in that guide.
Session Protocol
- Duration: 5-20 minutes per treatment area
- Frequency: 3-5 sessions per week minimum; daily is optimal
- Timeline: Consistent use over time before assessing visible improvement; some early changes in feel or tone may appear sooner, while deeper collagen-related changes build over weeks of regular use
- Skin prep: Clean, product-free skin before sessions
For guidance on building a home setup, device placement and distance recommendations are covered in detail there.
Realistic Expectations
Red light therapy improves the appearance of stretch marks - texture, color, and surface smoothness - rather than eliminating them entirely. New marks respond more quickly and noticeably than established ones. Results require ongoing maintenance.
Red light therapy is more effective than most topical treatments for dermis-level collagen stimulation, but less aggressive than clinical procedures like laser resurfacing. For those weighing home use versus clinic treatments, that comparison covers cost, access, and outcome differences in depth.
What to Look for in a Device
- Coverage area: Stretch marks cover large body surfaces; 1,000+ cm² per session is significantly more practical
- Wavelength accuracy: Verified 660nm output matters
- Session time: 5-minute high-output sessions are more sustainable for daily use
Frequently Asked Questions
Does red light therapy work for stretch marks?
Yes, with appropriate expectations. Research supports improvement in appearance, particularly texture and color normalization. New marks respond better than established ones. With a properly powered device, some users notice early changes in skin feel or tone after just a few treatments, while deeper improvements build with consistent use over time.
Can red light therapy remove stretch marks completely?
No. Stretch marks are a structural skin change. Red light therapy improves their appearance significantly with consistent use but does not eliminate them.
Is red light therapy better than creams for stretch marks?
For dermis-level collagen stimulation, yes. Most topical creams have limited dermis penetration. Red light therapy works at the collagen-producing cell level in the dermis where stretch marks form.
Consistent Coverage Produces Consistent Results
Lumara's Illuminate V2 - 660nm, 1,800 LEDs, 1,200 cm², 6,000 joules in 5 minutes, FDA cleared - covers the body areas where stretch marks most commonly occur in sessions that fit any schedule.