Introduction
Dry eye disease is one of the most common ocular conditions, affecting hundreds of millions of people globally. Standard management includes artificial tears, lid hygiene, meibomian gland expression, and in more severe cases, prescription drops or in-office procedures.
Red light therapy has emerging evidence for dry eye management, particularly for meibomian gland dysfunction (MGD) - the most common underlying cause of evaporative dry eye. This guide covers what the research shows, how the mechanism applies, and how to use a consumer device safely.
Key Takeaways
- Meibomian gland dysfunction (MGD) is the most common cause of dry eye; the glands produce the lipid layer of the tear film that prevents evaporation
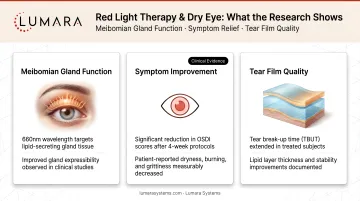
- Red and near-infrared light therapy at 630-850nm has evidence for improving meibomian gland function, reducing inflammation, and improving tear film quality
- Periorbital application (around the eye area, with appropriate eye protection) is the standard approach - light is not directed into the eye
- Multiple clinical studies show improved symptoms and meibomian gland function with consistent periorbital photobiomodulation
- Always use proper eye protection during any red light therapy session involving the periorbital area
The Mechanism
Meibomian Gland Function
The meibomian glands are located in the eyelids and produce the oily outer layer of the tear film. This lipid layer prevents tears from evaporating too quickly. When these glands are dysfunctional (blocked, atrophied, or producing poor-quality meibum), the tear film becomes unstable and evaporates faster - producing dry eye symptoms.
Red and near-infrared light therapy has two mechanisms relevant to meibomian gland function:
Heat effect: Red light, applied to the periorbital area with closed eyes, warms the eyelid tissue. This can help liquify thickened meibum in blocked glands, similar to how warm compresses work in MGD management.
Photobiomodulation effect: Anti-inflammatory and cellular energy effects at the gland level may support normal meibomian gland function and reduce the chronic low-grade inflammation associated with MGD.
What the Research Shows
Several small to moderate-sized clinical studies have examined photobiomodulation for dry eye and MGD:
- Studies using IPL (intense pulsed light) applied to the periorbital area - a related but higher-powered light therapy - have the strongest evidence base for MGD treatment
- Lower-powered LED therapy studies show improvements in meibomian gland expression quality, symptom scores, and tear break-up time versus controls
- A 2022 systematic review found consistent improvements in dry eye symptoms with periorbital photobiomodulation approaches
The evidence is more developed for IPL (clinic-based) than for consumer LED devices. Consumer LED applications have promising but smaller evidence bases.
Important context: Dry eye has multiple causes. Aqueous-deficient dry eye (from reduced lacrimal gland tear production) has a different mechanism from evaporative dry eye (MGD). Red light therapy has more mechanistic relevance for evaporative/MGD-predominant dry eye.
Safe Protocol for At-Home Use
Eye Protection Is Mandatory
This cannot be stated strongly enough: always use appropriate eye protection during red light therapy sessions near the periorbital area.
Eye inserts or protective goggles that block light from passing through to the retina are required. Most facial LED masks include eye inserts for this purpose. Do not use a device near the periorbital area without confirmed light-blocking eye protection.
Device Positioning
For dry eye applications:
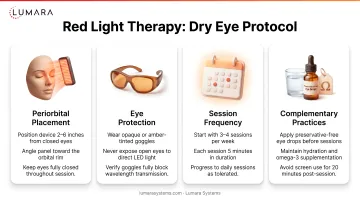
- Position the device over the periorbital area (around the eye, over the eyelids) - not directed directly into the open eye
- Use with eyes closed and eye inserts in place
- The light passes through the eyelid tissue to warm and stimulate the meibomian glands
Session Protocol
- 5-15 minutes per session
- 3-5 sessions per week initially
- Consistent use over 4-8 weeks before assessing improvement
- Follow manufacturer session guidance
Complementary Practices
Red light therapy for dry eye works best alongside:
- Warm compresses (which directly heat and express meibomian glands)
- Lid hygiene routine (removing debris that can block gland openings)
- Omega-3 supplementation (evidence for improving tear film quality)
- Artificial tears as needed for symptom relief
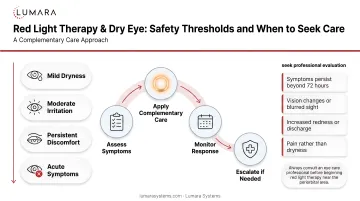
When to See a Doctor
If dry eye symptoms are severe, worsening, or not responding to home management, an ophthalmologist or optometrist evaluation is important. Dry eye can be a symptom of systemic conditions, and significant visual impact warrants professional assessment.
Red light therapy is a supportive home tool, not a replacement for professional dry eye management in moderate-to-severe cases.
Frequently Asked Questions
Can red light therapy help dry eyes?
Evidence supports periorbital photobiomodulation for improving meibomian gland function and reducing dry eye symptoms, particularly in evaporative/MGD-predominant dry eye. Results require consistent use over weeks.
Is red light therapy safe to use near the eyes?
Yes, with proper eye protection. Light-blocking eye inserts or goggles are required during periorbital sessions. The device should not be used with the eyes open and unprotected.
What wavelength helps with dry eye?
630-850nm has been studied for MGD and dry eye. Consumer LED masks in the 660nm range can provide both the mild thermal and photobiomodulation effects relevant to meibomian gland function.
How long before I see results for dry eye?
Research protocols typically run 4-8 weeks. Consistent use is necessary - occasional sessions are less likely to produce sustained improvement.
Support Your Tear Film With Consistent Periorbital Sessions
Red light therapy for dry eye is one of the more clinically interesting home applications - the mechanism is directly relevant to the most common underlying cause (MGD), and early evidence is positive.
Lumara's VISO LED Mask - 660nm, 470 micro-LEDs, FDA cleared, includes eye inserts for safe periorbital sessions - provides the consistent 660nm delivery that makes this protocol practical.